Tuesday, February 21, 2012

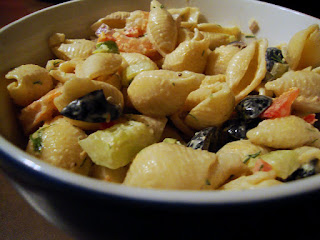
Summer Pasta Salad


I am a huge fan of pasta salads no matter what the season, but especially in the spring and summer. They are a great addition to cook-outs, lunches or just for a snack. There is a plethora (Jeffe, do even know what a plethora eees? [3 Amigo's Reference for you non-movie watchers]) of things you can do with a pasta salad. Really your options are endless!

Pasta salad is a descendant of the macaroni dish served either hot or cold, and in America, dishes with the title "pasta salad" started around 1960, and then grew in popularity in the 1980's. Originally it was considered more of an upscale yet affordable dish but always a great way to use up leftovers. It wasn't long before it hit the mainstream, and now you can buy full on pasta salad box kits in your local grocery store. While some the kits can be tasty, nothing can compete with throwing down your own pasta salad from scratch. Here is one I did recently that it fairly easy and most excellent in the taste category. Yet as always, feel free to change it up with your own interpretations!

Ingredients

2 Bags of medium frozen shrimp (around 1 1/2 lbs)
1 box of small pasta shells
1 Red Pepper
2 cucumbers
2 tomatoes
1 can of black olives (pits removed)
1/3 of a red onion
2 Tbls. Fresh Dillweed
1 cup of mayonaise
1 lemon
Old Bay Seasoning
Salt & Pepper

Preparation

Boil your shrimp as directed on the packages. You can also choose to sautee them if you prefer. Peel and devein. Cook your pasta in a pot of water with a tablespoon of salt. You should cook the pasta to al dente as it will finish up to the desired tenderness as it cools down. Drain the pasta, but don't rinse it in cold water as you will wash off all the starchy goodness!
While your shrimp and pasta cook, peel the cucumbers and seed them and then rough chop them into bite sized pieces and add to a bowl. Cut and seed your tomatoes, cut them into bite sized pieces as well, adding them to the bowl. I only used half the red pepper since I had quite a large one, but you can add as much as you prefer. You will of course remove the seeds from the pepper and rough chop it as well. Dice your red onion and add to the mixture. Rough chop olives and dill and add to the bowl. With a small grater, zest your lemon and add it to the bowl, then cut the lemon and squeeze half of the juice into your mixture as well. You can also use some white wine vinegar in place of the lemon if you prefer.
Now that all the fresh veggies and herbs are in the bowl, you can now add your cooked shrimp and pasta. I let mine cool down to room temperature before adding. You can now add your mayonaise and stir it in until you have a light coating through out. I didn't measure an exact cup of mayonaise here, I just added mixing spoons of it until I got it to the desired amount. Add the Old Bay Seasoning, salt and pepper to taste. I only added a few dashes of the Old Bay, and went light on the salt and pepper so that once it was served, people could add more salt and pepper if they preferred.
This makes quite a huge bowl of pasta that will serve at least 12 people or more depending on the serving sizes. Enjoy!

Beer Pairing: Witbier or a Summer Blonde Ale
Wine Pairing: Sauvignon Blanc

Sunday, January 15, 2012

Home-Brewed Beer Bread

Besides cooking and baking one of my passions as many of you know is brewing beer. I am constantly trying new styles and recipes for beers, and of late have spent more time brewing than I have in the kitchen. But this week I decided it might be a good time to combine the two passions by taking one of my recent home-brews and making it one of the star ingredients in a bread.
Beer bread is not your normal light and fluffy bread that you would use for sandwiches and the like, but rather a more dense bread that is great as a starter or snack, and pairs most excellently with various cheeses, olive tapenade, and the like.
Your beer bread will vary in flavor depending on what type of beer you use (I used a Rye Ale I made a couple months ago), although I cannot stress enough the importance of using a good quality craft or home-brewed beer. Don't screw up your final product by dumping some watered down commercial beer in there. At any rate this bread is very easy and fairly quick to make, so get in the kitchen and give it a go!

Ingredients
3 cups of sifted flour (make sure to sift your flour!)
2 large eggs
3 tsp. baking powder
1 tsp. salt
1/4 cup sugar
12 oz. of a good quality beer
1/4 to 1/2 cup of melted butter

Preparation
Preheat oven to 375. Mix the dry ingredients together with the eggs and beer in a large mixing bowl. You may need to add a little more flour to make it a little less sticky (I added a couple more sifted spoonfuls to get it to the desired consistency). Add your mixture to a greased bread pan and then pour the melted butter over your mixture. I actually melted a full 1/2 cup of butter here, but didn't use all of it, because a little over a 1/4 cup was plenty, but add as much as you prefer. Place in the oven and bake for 1 hour. Remove from oven and take the loaf out of the pan and let cool for about 15 minutes on a baking rack. Slice and serve.
That's it! You can also add additional dried herbs to this mixture depending on what flavors you are going for and that would best match the type of beer you ended up using. Feel free to experiment! Enjoy!

Sunday, July 31, 2011

The Quest for Biscuits Continues: Red Lobster Style


So for any of you that have read my little food blog from the beginning, know that I orginally started this whole adventure in the quest to return to my baking roots. My first attempt at making biscuits ended up being a complete failure, as far as biscuits are concerned since I ended up with some sad looking crackers instead of fluffy and delightful biscuits.

So I left the baking world for a while, and busied myself with soups, salads, and entree style dishes instead, with a dessert thrown in here and there for good measure. Recently however, my fiance's mother sent over a recipe for biscuits that was styled after the ones that are served at Red Lobster. For any of you who have had the pleasure of eating a biscuit from Red Lobster, know that these cheesy fluffy little dinner rolls are quite delightful.

So this morning I made a second attempt at making biscuits with this easy recipe, and they came out...well...freaking awesome. Give these a try. They will go good with any meal in my humble opinion.

Ingredients

2 cups Bisquick
2/3 cup of milk
1/2 cup cheddar cheese
1/4 cup butter or margarine
1/2 tsp. garlic powder

Preparation

Preheat oven to 450 F. Mix the Bisquick, milk, and cheddar cheese together in a bowl until all combined. Consistency will be a bit sticky. Don't over mix though, as too much mixing can cause the bisquick to not bake properly and make the biscuits heavy instead of fluffy and light.

Using a tablespoon, place drops of the biscuit mixture on an ungreased cookie sheet. Bake for about 10 minutes (sometimes less depending on how big you've made your drops of dough, just keep an eye on them.)

Melt the butter in the microwave and then stir the garlic powder into the melted butter. Once you remove the biscuits from the oven, brush the butter/garlic mixture lightly over the top of the biscuits. Serve warm. Makes 10-12 biscuits.

Thursday, July 28, 2011

Flippin' Good Fruit Smoothie


Warm summer mornings often call for something cool to drink to start your day. Especially if they are pretty damn good for you. I often use this beverage as a full breakfast. With the fruit, yogurt, orange juice, water and then the addition of the nutritional supplement I throw in, its just plain health in a glass. However, because fruits do have a lot of natural sugars in them, this may not be the drink for those who are diabetic or need to watch sugar levels in general.

With the wonders of modern day technology when it comes to keeping foods frozen, this can actually be enjoyed year round. You can freeze fresh fruits you have picked in the summer, or you can buy bags of frozen fruit at your local grocery store.

Ingredients

1/2 Banana, frozen
1/2 cup Frozen mixed berries (raspberries, blackberries, strawberries)
1/2 cup Frozen peach slices
1/2 cup Orange Juice
1/2 cup Nonfat Yogurt, plain
Water

Optional: 1 Tbs. Super Green Max Plus (available at www.swansonvitamins.com)

Preparation

Add all the ingredients to a blender. The amount of water you use will vary. After adding the orange juice, I usually add just enough water to reach the top of the fruit so that it blends easier and doesn't end up being overly thick. Blend the mixture. Pour. Enjoy.

Nutritional Information

Serving Size: 2 1/2 Cups
Calories: 233
Fat: 0
Cholesterol: 2.5 mg
Carbs: 49 g
Fiber: 5 g
Sugars: 36 g
Protein: 9 g

Acorn Squash Soup


So here it is the end of July and I'm writing (and cooking) a recipe for acorn squash soup. Doesn't quite sound like summer fare does it? Acorn squash, butternut squash, pumpkins, etc., are usually more associated with the fall or winter months, as they kind of fit into that warm comfort food genre. However, my dad was kind enough to bring me a bounty from his garden this past week that included six acorn squash. Having never made anything with them previously, I decided to give it a try.

Acorn squash is actually indigenous to the Western Hemisphere, and wasn't known to Europeans until after Columbus sailed the ocean blue. Originally, when the Europeans first found it, they only ate the seeds of the acorn squash since the flesh was thought to be to hard to deal with. Later on the European settlers learned that squash in general was easily stored for winter and became pretty big fans of this hardy vegetable.

So while you may not think that acorn squash soup is your idea of a good meal on a hot summers night, it is still good eats at any time. But if you don't make it until fall or winter, you will still enjoy this delicious soup.

Ingredients

6 Acorn Squash
6 cloves of garlic, peeled
1 small onion (about 1 cup, rough chopped)
3 Tbs. Olive Oil
1 Stick of Unsalted Butter
4-6 cups of Chicken Broth depending on how thick you want your soup. Can also substitute vegetable broth.
1 tsp. Ground Sage
1 tsp. Savory
1/2 cup 2% milk
1/2 cup Nonfat Plain Yogurt
1/2 tsp. cayenne (or 3 dashes of red pepper flakes)
Salt
Black Pepper

Preparation

Preheat oven to 350F. Cut the acorn squash at the equator. Remove the seeds with a spoon and discard. Place the acorn squash, cut side up, on a baking sheet pan. Put two garlic gloves in the center of three of the squash. In the other 3 squash halves divide the 1 cup of onion. Drizzle the squash with 2 Tbsp. of the olive oil, then sprinkle lightly with salt and ground pepper. Place the squash in the oven and bake for approximately 1 hour. (May take a little longer or shorter time depending on thickness/size of the squash. They should be very soft when ready, nearly ready to cave in).

Remove the squash from the oven and let stand until cool enough to handle. Once cooled, remove the onion and garlic cloves and set aside. Scoop the flesh of the squash out into a separate bowl and discard the skins. In a large pot, add the stick of butter, the remaining Tbsp. of olive oil, and the garlic and onion that were in the center of the squash. Cook on medium to high heat until the butter melts and just begins to foam. Add 1/2 cup of the chicken stock and stir to remove any bits from the bottom of the pan. Reduce the heat to medium. Then add the remaining stock, all of the squash, milk and yogurt. Continue to stir and bring to a light simmer.

Once the soup has come to a simmer, use a stick blender to puree the mixture. If you do not have a stick blender, you can ladle it into a blender and puree it in batches and then add it back to the pot. Once the soup is pureed, add the savory, sage and cayenne or red pepper flakes. Stir until the spices are fully incorporated. Serve hot.

This soup has a creamy and buttery flavor. I didn't have the cayenne, so I used 3 dashes of red pepper flakes, which gave it a nice spice kick at the end.

Nutritional Information

Serving Size: 2 Cups (information below is based on using low sodium chicken stock).

Calories: 336
Total Fat: 16 g
Cholesterol: 16 mg
Carbs: 48 g
Fiber: 16 g
Protein: 16 g

Wednesday, May 25, 2011

The Portobello Push


Portobello Mushrooms, the vegetarians steak. Mushrooms, Portobello's in this particular recipe, are quite versatile and can be used in all manner of cooking, baking and grilling. Many of you remember the scene in Forrest Gump, when Bubba was reciting all the different ways to make shrimp. Well the Portobello could just as easily be inserted there. Portobello sandwiches, Portobello salad, grilled Portobello, stuffed Portobello, so on and so forth. And with vegetarianism being much more chic these days, Portobello's and the rest of the fungus family have become quite the rage.

There are a few variations of the history of the Portobello and how it got its name, but the one that I like the best (and the one that seems most feasible to me) is that the portobello in Northern Italy is called "cappellone" which means "big hat". Whatever its name origination, the only thing we need to know is that it is some good eatin'.

I have dabbled in the past with stuffing Portobello Mushrooms and grilling them on a charcoal grill, which came out quite good, but this is a newer revised recipe that I threw together a couple weeks ago. Hope you enjoy it!

Ingredients

8 medium to large Portobello Mushrooms, stems included.
2 or 3 green onions
1/2 Cup Feta Cheese
1/2 Cup Extra Sharp Cheddar Cheese
3 to 4 pieces of white bread
1 egg
Dried Sage (2 or 3 pinches)
Salt & Pepper to taste
Olive Oil

Preparation

Remove the stems from the mushrooms and set aside. Then using a small spoon or butter knife, scoop out the dark inside of the caps and discard. Dice up the stems that you had set aside along with with the green onions. Add the stems and green onion to a frying pan with enough olive oil to grease the pan and sautee over medium high heat until the onions are soft and most of the liquid has been cooked out of the stems. Set aside and let cool a bit.
In a bowl add the Feta and Cheddar Cheese, two or three pinches of sage, and salt and pepper to taste. Toast the slices of bread until they are very dark (but not burnt) and then crumble them into small bits into the bowl with the cheese. The bread bits should be pretty small, to basically make your own bread crumbs. You can substitute store bought bread crumbs here as well, but I didn't have any on hand and this worked out great. Beat the egg, and then add it to the mixture. Add the sauteed mushroom stems and onion and stir the entire mixture until it has all blended well.

Rub the backs of the mushroom caps with olive oil and place oil side down in a large baking dish. Then using a spoon, scoop the mixture into the mushroom caps. It is completely fine to overstuff them! Once all caps have been filled with the mixture, place in a 425 degree oven for 20 minutes. Serve hot. We had this with corn on the cob and grilled chicken and it was an excellent dinner!

Friday, January 28, 2011

Snow Comfort Food: Creamy Potato Soup


So we all know that the potato is a pretty popular comfort food these days. Baked potatoes, french fries, potato au gratin, potato soup and everything in between. Potatoes seem to be also normally associated with us Irish with the whole potato famine thing. But these wondrous tubers didn't originate in Ireland.

As history goes, potatoes were being cultivated in Peru as early as 3000 B.C. They didn't come to Ireland until somewhere between 1665 and 1685 (there are some conflicting stories there). And as with many of the fruits and vegetables we eat today, potatoes were something to fear by those silly Europeans who thought that the potato could cause leprosy, syphillis and was even a dangerous aphrodisiac.

Sir Walter Raleigh is often credited with bringing potatoes to Ireland when he was given land there by the queen to grow tobacco and potatoes. One story said that when Sir Walter Raleigh presented potatoes to the Queen as a gift, the Queens cook didn't know what to do with them and threw them out and cooked the leaves instead!

All history aside, I'm a fan of soups during the cold weather months. Earlier this week as a snow storm moved into the northeast, I decided it was a good time to make a soup. So I rummaged around the kitchen and came up with the recipe below. Hope you enjoy it!

Ingredients

6 cups water
5 stalks of celery cut in half
6 carrots peeled and cut into 2 inch pieces
1 onion diced
8 - 10 medium yukon gold potatoes (cut into 1 or 2 inch cubes)
1 cup sour cream
1 cup 2% milk
1/2 stick of butter
3 cloves of garlic (minced)
Salt
Black Pepper
Dried Sage
Additions:
1 package of butter & herb instant mashed potatoes
additional sour cream for garnish
cilantro leaves for garnish

Broth Preparation

Add the six cups of water to a large pot over high heat and season generously with salt and pepper. The amount of salt and pepper you use is up to your desired taste. I put in a couple of large pinches of each and added some more as I went along with the soup until I got the taste I was looking for. Add the carrots, celery and onion. Bring to a rolling boil and then back the heat off until it is simmering. Let simmer about 20 minutes, or until all ingredients are soft. When complete, remove the celery with a pair of tongs or a slotted spoon and discard. I find that celery can end up being a bit stringy when making a cream soup, so I only add them to the broth to extract flavor and then remove them.

Soup Preparation

Once the celery has been removed, add the potatoes and garlic and a few pinches of the dried sage. Bring back to a boil for a minute or two and then reduce heat and let simmer until the potatoes are soft (about 15 minutes).

Turn off the heat and add your soup mixture to your blender or food processor in batches. For this part I have a hand blender (that I call my motorboat). I added my mixture to a large plastic pitcher and ground it all at once with the hand blender. Blend until it is a smooth consistency.

Pour the blended mixture back into your pot and add the sour cream, butter and milk. Stir until all is combined and heated through. It was here that I found that my mixture was thinner than I wanted. At the suggestion of my girlfriend I added about a quarter package of the butter and herb mashed potato mix to thicken it some. If you use this technique, don't add very much, just a little at a time until you get your desired consistency, otherwise you will just end up with some well seasoned mash potatoes.

This soup is creamy and has a nice buttered yellow color with bits of orange from the carrot. Topped with a dollop of sour cream and cilantro leaves and a side of crusty bread and you will have some serious comfort food. Enjoy!