Tuesday, February 21, 2012
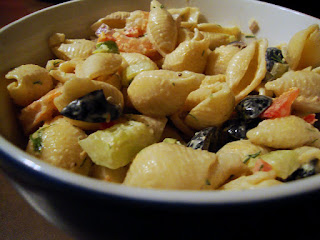
Summer Pasta Salad
I am a huge fan of pasta salads no matter what the season, but especially in the spring and summer. They are a great addition to cook-outs, lunches or just for a snack. There is a plethora (Jeffe, do even know what a plethora eees? [3 Amigo's Reference for you non-movie watchers]) of things you can do with a pasta salad. Really your options are endless!
Pasta salad is a descendant of the macaroni dish served either hot or cold, and in America, dishes with the title "pasta salad" started around 1960, and then grew in popularity in the 1980's. Originally it was considered more of an upscale yet affordable dish but always a great way to use up leftovers. It wasn't long before it hit the mainstream, and now you can buy full on pasta salad box kits in your local grocery store. While some the kits can be tasty, nothing can compete with throwing down your own pasta salad from scratch. Here is one I did recently that it fairly easy and most excellent in the taste category. Yet as always, feel free to change it up with your own interpretations!
Ingredients
2 Bags of medium frozen shrimp (around 1 1/2 lbs)
1 box of small pasta shells
1 Red Pepper
2 cucumbers
2 tomatoes
1 can of black olives (pits removed)
1/3 of a red onion
2 Tbls. Fresh Dillweed
1 cup of mayonaise
1 lemon
Old Bay Seasoning
Salt & Pepper
Preparation
Boil your shrimp as directed on the packages. You can also choose to sautee them if you prefer. Peel and devein. Cook your pasta in a pot of water with a tablespoon of salt. You should cook the pasta to al dente as it will finish up to the desired tenderness as it cools down. Drain the pasta, but don't rinse it in cold water as you will wash off all the starchy goodness!
While your shrimp and pasta cook, peel the cucumbers and seed them and then rough chop them into bite sized pieces and add to a bowl. Cut and seed your tomatoes, cut them into bite sized pieces as well, adding them to the bowl. I only used half the red pepper since I had quite a large one, but you can add as much as you prefer. You will of course remove the seeds from the pepper and rough chop it as well. Dice your red onion and add to the mixture. Rough chop olives and dill and add to the bowl. With a small grater, zest your lemon and add it to the bowl, then cut the lemon and squeeze half of the juice into your mixture as well. You can also use some white wine vinegar in place of the lemon if you prefer.
Now that all the fresh veggies and herbs are in the bowl, you can now add your cooked shrimp and pasta. I let mine cool down to room temperature before adding. You can now add your mayonaise and stir it in until you have a light coating through out. I didn't measure an exact cup of mayonaise here, I just added mixing spoons of it until I got it to the desired amount. Add the Old Bay Seasoning, salt and pepper to taste. I only added a few dashes of the Old Bay, and went light on the salt and pepper so that once it was served, people could add more salt and pepper if they preferred.
This makes quite a huge bowl of pasta that will serve at least 12 people or more depending on the serving sizes. Enjoy!
Beer Pairing: Witbier or a Summer Blonde Ale
Wine Pairing: Sauvignon Blanc
Labels:
Old Bay,
pasta salad,
Salad,
Shrimp,
summer salad
Sunday, January 15, 2012
Home-Brewed Beer Bread
Besides cooking and baking one of my passions as many of you know is brewing beer. I am constantly trying new styles and recipes for beers, and of late have spent more time brewing than I have in the kitchen. But this week I decided it might be a good time to combine the two passions by taking one of my recent home-brews and making it one of the star ingredients in a bread.
Beer bread is not your normal light and fluffy bread that you would use for sandwiches and the like, but rather a more dense bread that is great as a starter or snack, and pairs most excellently with various cheeses, olive tapenade, and the like.
Your beer bread will vary in flavor depending on what type of beer you use (I used a Rye Ale I made a couple months ago), although I cannot stress enough the importance of using a good quality craft or home-brewed beer. Don't screw up your final product by dumping some watered down commercial beer in there. At any rate this bread is very easy and fairly quick to make, so get in the kitchen and give it a go!
Ingredients
3 cups of sifted flour (make sure to sift your flour!)
2 large eggs
3 tsp. baking powder
1 tsp. salt
1/4 cup sugar
12 oz. of a good quality beer
1/4 to 1/2 cup of melted butter
Preparation
Preheat oven to 375. Mix the dry ingredients together with the eggs and beer in a large mixing bowl. You may need to add a little more flour to make it a little less sticky (I added a couple more sifted spoonfuls to get it to the desired consistency). Add your mixture to a greased bread pan and then pour the melted butter over your mixture. I actually melted a full 1/2 cup of butter here, but didn't use all of it, because a little over a 1/4 cup was plenty, but add as much as you prefer. Place in the oven and bake for 1 hour. Remove from oven and take the loaf out of the pan and let cool for about 15 minutes on a baking rack. Slice and serve.
That's it! You can also add additional dried herbs to this mixture depending on what flavors you are going for and that would best match the type of beer you ended up using. Feel free to experiment! Enjoy!
Subscribe to:
Posts (Atom)